I have been back at my spinning wheel again in readiness for the winter nights, a pleasure that seems to return every year when the weather changes. Over the last few years I have been learning to spin and to use natural dyes. The process of collecting colour from the wild, just like foraging is a lovely rewarding activity. It keeps
you in contact with the seasons by collecting your own plant materials, leaves, flowers, berries or bark when the time is right.
Before this summer ended, I wanted to create some new natural colours to add to my wool stash for the winter. I've totally avoided the synthetic dyes as they just seem so harsh and tend to shout so much. Natural colours always blend well with each other and I like having the direct link back to their natural source too.
 |
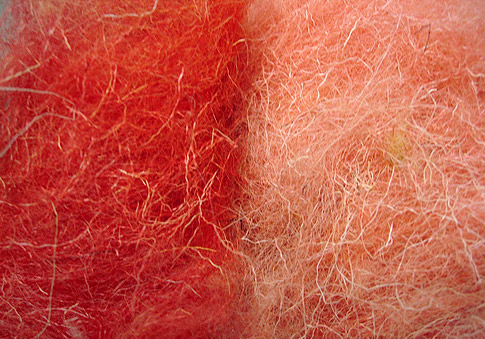
1. Madder root red, 2nd dye madder root makes coral.
2.Guelder rose berries - pink/yellow.
3. Cochineal beetle purple handspun.
4. Poplar leaves makes yellow and saddened with
iron makes green tinge.
5. Mohair dyed with buddleia leaf makes yellow. |
 |
| Jacob dyed with cochineal beetle |
Winter seems to be the natural time
when the knitting and spinning really gets going for me. With all those
long evenings what else would I be doing! (apart from whittling)..
Anyway, a month or so ago I had mordanted some sheep wool with Alum at home. Alum and other mordants like Chrome, Iron and Oxalic Acid help to achieve stronger
colour shades where the normal sheep fleece doesn't pick up the dye. I collected various plant materials that were available in the wood and had a few dying sessions with a pot over the fire.
Finally after a few years of trial and error I am
happy to be getting much better and consistent results. It is a time
consuming processing, so this is very satisfying progress indeed!
 |
| Wensleydale dyed with Onion Skins |
|
People ask me 'Where do I get my sheep fleece?' - It's £5 per fleece from most farmers, is the answer. I brought 5 sheep fleece this summer from www.sheersheep.co.uk who were demonstrating sheering at Letchworth Arts Festival. One fleece was a super coarse pure white Rams wool - a brilliant wiry contrasting wool to any of the soft lambs wool I'd also bought.
It took two solid days of skirting, washing and drying those five fleece plus a few other Zwartbles (black fleece) on a sunny weekend. This has given me plenty of cheap material to work with over the winter. Only problem is storage usually, but a shed or greenhouse to store the fleece in over winter is fine.
 |
Coarse rams wool and alum
mordant dyed with Madder Root,
second dye makes coral. |
After washing and drying the wool I either mordant and/ or dye it. Then comes the nice bit where I card it on my drum carder to clean out any further bits and start selecting colours to blend together. It's like creating a palette to work with.
Depending on what I want to do - either spin all one colour - or have a crazy mix of colours I create 'batts' of different colourways and textures with different types of fleece to create very different yarns. Mixing natural dyed wool with the natural sheep colours - grey, whites and blacks enables all sorts of variations to be achieved.
 |
| 3 Zwartble batts | |
Spinning is more interesting when you see the colours and textures change through your fingers. Every piece of wool goes through my hands at least four times before it becomes a finished item - a knitted hat, a scarf, a blanket. That really does make it handmade.
 |
| Close up of weave. |
I usually make scarves from the softest Wensleydale yarns, and for most of the rest I'm putting it into handmade blankets, ponchos and shawls. It's a slow process, one blanket can take a week to make, but the whole process from sheep to shawl is a great process to know how to do and makes my final work feel like something truly special.

Some coloured wools go towards my 'Weaving with Nature' workshop stash - and this is great to show people at festivals just how beautiful natural colours are.


 Here is a little commission I made recently of a garden planter.
  I made it a bit more rustic and freeform
however - showing off the curves of the oak a little. It should last
many years to come.
I made it a bit more rustic and freeform
however - showing off the curves of the oak a little. It should last
many years to come.


 We split the log into about eight sections, each sufficient for a post -
or
rail, choosing the lighter one for the top cross piece. By securing the
pieces in the cleaving break we cleaned the faces of the oak posts up
with a draw knife.
We split the log into about eight sections, each sufficient for a post -
or
rail, choosing the lighter one for the top cross piece. By securing the
pieces in the cleaving break we cleaned the faces of the oak posts up
with a draw knife. The frame was drilled and pegged together with dried oak wedges. Enough was left
over for Martin to make a slatted bench too - albeit the most
uncomfortable bench anyone could ever sit on (not my words!) and I made
an oak planter.
The frame was drilled and pegged together with dried oak wedges. Enough was left
over for Martin to make a slatted bench too - albeit the most
uncomfortable bench anyone could ever sit on (not my words!) and I made
an oak planter.
 I learnt to make hay rakes this year, partly because of an order for 5
children sized hay rakes from the Great Glen Community Wildspace group
in Leicester.
I learnt to make hay rakes this year, partly because of an order for 5
children sized hay rakes from the Great Glen Community Wildspace group
in Leicester.


 I used dried silver birch for the tines or teeth - bashing the roughed
out dowels through a tine cutter of 11mm to make clean dowels. The tines
are set in at approx 1.5" to 2" spacing across the green ash head and
flats are put on the backs so the tines don't split.
I used dried silver birch for the tines or teeth - bashing the roughed
out dowels through a tine cutter of 11mm to make clean dowels. The tines
are set in at approx 1.5" to 2" spacing across the green ash head and
flats are put on the backs so the tines don't split. Please come and join me at
  Just spent a fab weekend at Letchworth Arts Festival doing a new workshop I've devised call 'Weave with Nature'. It ticks all my boxes - bringing greenwood, natural materials, colour and a good organic measure of creativity into the mix. The idea of this workshop is to encourage people to get into natural materials, and enjoy natural fibres, plants, textures and colours. I am basically providing a creative space for people to play and explore.
 It is suitable for country fairs, festivals, shows or school workshops - indoors
or outdoors and will reflect the seasons.
It is suitable for country fairs, festivals, shows or school workshops - indoors
or outdoors and will reflect the seasons.
 There is a flat rate charge to the organizer per day to cover all materials that might be
used. If you wish to keep the panels of artworks as a legacy of the day
they can also be purchased for a small fee - this primarily covers the
cost of making the rustic frames.
There is a flat rate charge to the organizer per day to cover all materials that might be
used. If you wish to keep the panels of artworks as a legacy of the day
they can also be purchased for a small fee - this primarily covers the
cost of making the rustic frames.

 Here are a couple of stools I recently made in Leicestershire. One of different cherry woods with a cherry plum seat. The other stool is very light with an oak seat and sweet chestnut legs/ stretchers.


